
Picture this: you’ve been hearing all the buzz about Berachain, and you’re curious to dip your toes into its unique DeFi and Web3 ecosystem. If you’ve been looking for a berachain bridge tutorial, you’re in the right spot. In this guide, I’ll walk you through every step of transferring assets from another chain onto Berachain, so you can explore liquidity pools, staking, or any other on-chain adventure that catches your eye. Let’s jump right in.
TL;DR
- Berachain bridging allows you to move tokens from an external chain (like Ethereum) onto Berachain.
- You’ll need a compatible crypto wallet (e.g., MetaMask) and some native tokens to pay network fees.
- The bridging process involves choosing a platform (like Baltex.io), verifying transaction details, and waiting for final confirmation.
- After bridging your tokens, you can freely use them in DeFi dApps, staking pools, or games on Berachain.
- Always double-check contract addresses, keep your wallet seed phrase private, and start small if you’re new.
Know bridging fundamentals
To start, let’s clarify what “bridging” actually means in crypto. A bridge is basically a connection between two blockchains, enabling you to move digital assets back and forth. When you bridge your tokens (let’s say, ETH) over to Berachain, you’re trading them on the original chain for wrapped or cast versions on Berachain. Sound complicated? It’s like leaving your physical coat at the coat check and getting a ticket that acts as a placeholder. That “ticket” is the wrapped asset living on Berachain. Your original tokens remain locked in the smart contract on the starting chain.
Bridges come in many varieties, and each one has a protocol for verifying and relaying transactions. Some rely on trusted intermediaries, while others use decentralized or cross-chain validation. The end goal remains the same: to let you use your assets on another chain. Doing so is ideal when you want to take advantage of a chain’s unique features or ecosystem — in our case, Berachain’s DeFi environment.
If you’re curious about bridging concepts in general, check out our Crypto Bridge guide for more background. This will give you a solid foundation before you dive deeper into cross-chain adventures.
Set up your wallet
Wallet setup is a crucial step. You’ll need a wallet that supports both your origin chain (like Ethereum, Binance Smart Chain, or Gravity Chain) and Berachain. Most bridging solutions today are designed to be used with a browser extension or a mobile wallet.
-
Choose a wallet: A popular pick is MetaMask. If you already have MetaMask installed, you’re ahead of the game. Hardware wallets are also an option if you value extra security, but for simplicity, we’ll assume you’re using MetaMask or a similar browser wallet.
-
Create your account: If you’re new to crypto and have never created a wallet, the interface guides you through it. You’ll receive a recovery phrase — 12 or 24 words. Store this phrase offline in a safe place.
-
Add a custom network: Since Berachain might not be loaded by default in your wallet, you’ll need to manually add it. For MetaMask, head to “Settings,” then “Networks,” and fill in the relevant RPC details. If you don’t have them yet, keep an eye on official Berachain documentation or community updates.
Keep your wallet password-locked, and never share your seed phrase with anyone. Even the bridging interface you use won’t need it. They only require your wallet signature to confirm transactions.
Add funds for bridging
Before you actually jump in and bridge to Berachain, ensure you have enough funds in your wallet for transaction fees and for the tokens you plan to transfer. Each chain has its own native coin (like ETH on Ethereum) for gas payments.
- Estimate the gas fees: On Ethereum, bridging might cost a bit more in gas than on cheaper chains. It’s wise to keep a small cushion of extra ETH to avoid any stuck transactions.
- Acquire bridging tokens: If you want to transfer stablecoins (e.g., USDC, USDT) or any other tokens, buy or swap them on your origin chain first. You can also check out Top Crypto Bridges 2025 to see which tokens are widely supported across popular cross-chain solutions.
- Consider bridging from Gravity Chain: In some cases, you may want to move assets from Gravity Chain over to Berachain. The same process applies, but you’ll use the Gravity chain’s native currency for fees before bridging.
Start small to test the waters. Send a small amount over and verify that everything works properly. Once you’re confident, you can transfer bigger balances without anxiety.
Connect to bridging interface
The bridging interface you use largely depends on the token you’re moving and how user-friendly you want the experience to be. You can think of bridging services like third-party tools that handle the cross-chain steps behind the scenes. Baltex.io, for instance, is known for its streamlined approach. It can simplify a lot of the manual steps, letting you connect your wallet and confirm a few details before bridging.
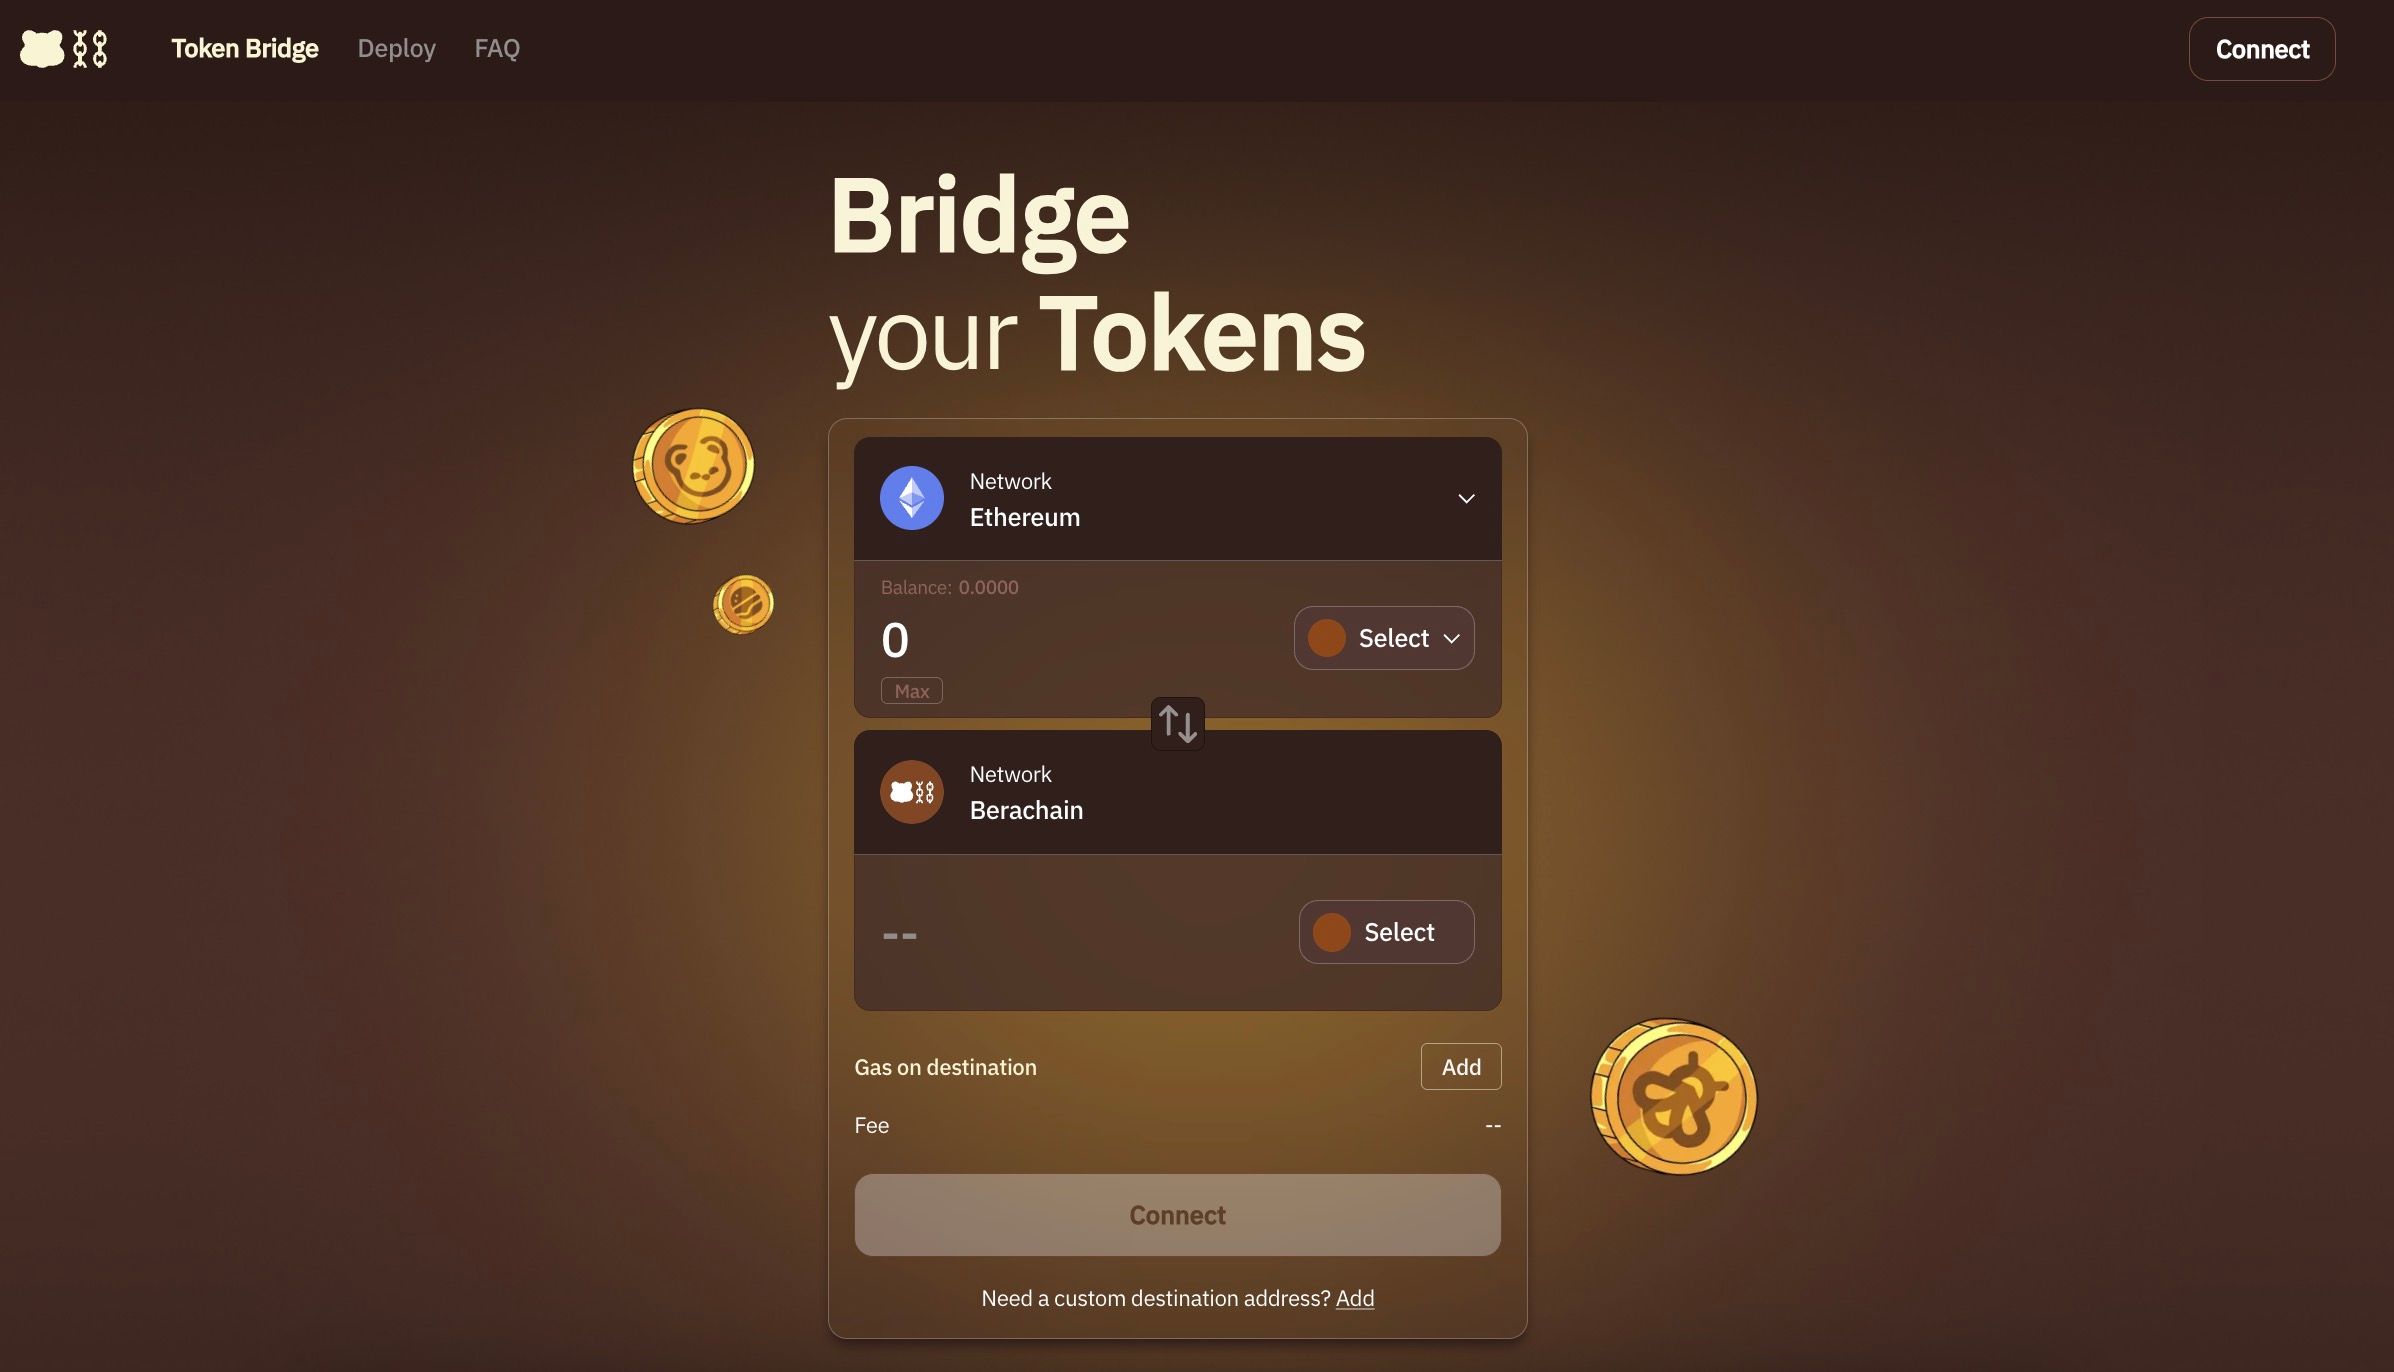
- Visit the bridging site: Head to the official website of your chosen bridging service. Be absolutely sure you’re on the correct URL. Scammers often create fake sites, so only trust official links or references from known communities.
- Connect your wallet: You’ll see a “Connect Wallet” button. Click it, then authorize the connection in your wallet pop-up.
- Choose origin and destination chains: Pick the chain you’re moving funds from (Ethereum, BSC, etc.) and select Berachain as your destination.
- Select the token and amount: That might be ETH, stablecoins like USDC, or a governance token you want to bring over for yield opportunities.
When you’re ready to proceed, your bridging interface outlines transaction fees, estimated wait times, and any bridging fees. Some platforms charge extra to maintain the network or pay watchers and validators that help secure the cross-chain movement.
Review and confirm
You’ve set everything up, so now’s the moment to review. This is a critical step for ensuring your funds go where they’re intended.
- Double-check addresses: Make sure the receiving address on Berachain is correct. If you’ve configured your wallet properly, the bridging interface usually grabs your address automatically.
- Confirm the numerical details: Is the token amount accurate? Have you factored in bridging fees? Some bridging services let you see the final net amount you’ll receive after fees.
- Inspect token contract: If you’re bridging a less common token, verify the token contract address matches your interface. Don’t rely solely on the name or ticker symbol.
- Accept or reject: Once you’re satisfied, hit confirm. Your wallet will prompt you again with the transaction summary. If everything checks out, finalize.
If you’d like a second bridging option or you prefer a more advanced feature set, it’s worth comparing platforms. Some offer instant confirmations or liquidity pools that let you swap into other assets the moment you arrive on Berachain.
Verify your assets
After confirming your transaction, you might wonder, “Now what?” Typically, the bridging interface shows a pending status for a few minutes. On certain networks, bridging can take anywhere from a few minutes to over an hour, depending on network congestion and the number of confirmations required.
- Wait for finality: Most blockchains require anywhere from a handful of confirmations to several dozen before concluding that your transaction is valid. If traffic is high, your wait could be longer.
- Check explorer: Nearly every blockchain has a block explorer (think Etherscan for Ethereum). For Berachain, there should be a specialized explorer where you can paste your transaction hash or wallet address to confirm the tokens have arrived.
- Add the token to your wallet: If the token you bridged doesn’t automatically show up in MetaMask, you might need to hit “Import Token” and paste the contract address. Once that’s done, you’ll see your updated balance.
- Refresh your dApp: If your bridging was done to take advantage of Berachain’s DeFi dApp ecosystem, reload the dApp’s page. It should detect the new chain and token balance.
If something seems off or your transaction is stuck, don’t panic. Contact the bridging service’s support, or look for community channels. It might be a small bug or a wallet setting you can fix easily.
Next steps after bridging
Once your tokens appear in your wallet on Berachain, there’s a ton of potential fun in store. You can explore yield farms, staking, or liquidity pools aimed at Berachain’s tokens. If DeFi is your jam, bridging over was just the beginning.
- Try yield farming: Many new blockchain networks incentivize liquidity providers with extra token rewards. Look around for pairs that match the tokens you just bridged.
- Engage with NFTs: Berachain’s NFT ecosystem may offer unique art collections or membership passes with real utility.
- Join gaming dApps: Crypto-based games often rely on chain-specific tokens for in-game transactions, expansions, or governance mechanics.
- Staking or delegating: Some blockchains allow you to stake tokens to secure the network while earning a percentage back over time.
And hey, if you ever decide to move your funds back to your original chain, the bridging process works in reverse.
FAQ: Top 5 questions
Below are five common questions so you can troubleshoot potential snags and better understand bridging in general.
1. How much does bridging cost?
It depends on two fees: network gas fees and bridging protocol fees. On Ethereum, for example, gas fees can spike during busy times, driving up your total cost. Some bridging platforms also charge a small protocol fee. Plan for these costs by having extra ETH or the origin chain’s native token.
2. Can I use any wallet for bridging?
Not all wallets support bridging. You need a wallet that can connect to your origin chain and Berachain. MetaMask is frequently compatible, but check each bridging platform’s documentation to be sure. Hardware wallets can work via browser interfaces, but the process can be more advanced.
3. Why isn’t my token showing up on Berachain?
If the tokens arrived but remain invisible in your wallet, you probably need to import the token contract address. Double-check that you added the correct contract. If your bridging interface displayed a success message, your tokens are likely there. You just need to reveal them in your wallet.
4. What if my transaction gets stuck?
Sometimes transactions linger if the network is clogged or if your gas settings were too low. Wait at least 30 minutes before taking any action. If it’s still unconfirmed, check your bridging service’s support resources for guidance on increasing gas fees or canceling the transaction.
5. How safe is bridging overall?
Bridges can be a security risk if the smart contracts or the oracles responsible for validating cross-chain moves prove vulnerable. Stick to well-audited services. Major bridging protocols invest in regular security audits, and user feedback quickly flags any suspicious behavior. Stay vigilant, and you’ll likely have a smooth experience.
Use Baltex.io for a simpler approach
Baltex.io deserves a special mention if you’re seeking a frictionless bridging experience to Berachain. It automates many of the tricky steps. Once you’ve connected your wallet, Baltex.io fetches the best bridging routes, estimates fees, and typically finalizes your cross-chain move in minutes. Plus, it has a friendly user interface that guides you from start to finish without overwhelming you with blockchain jargon.
- Go to Baltex.io (copy and paste the URL carefully).
- Connect your wallet (MetaMask or another supported wallet).
- Select your origin chain and tokens, then pick Berachain as your destination.
- Confirm transaction details, and let Baltex.io take care of the rest.
Within a short while, your newly arrived tokens should show up in your wallet on Berachain, paving the way for you to explore the chain’s DeFi realms.
What to do if bridging fails
Bridging failures can happen. Maybe your internet glitched or the bridging service had downtime. Here’s how to keep calm and carry on in such cases:
- Check your transaction hash on the block explorer of the origin chain. If it didn’t go through, you might just need to try again.
- If the bridging interface reports an error, reconnect your wallet and confirm you’re on the right network in your wallet settings.
- Occasionally, bridging can partially succeed, meaning your tokens might be locked but not yet reflected on Berachain. Contact support if you suspect a partial transaction. Provide them with your wallet address, transaction hash, and screenshots of any error messages.
If your bridging service is reputable, their support should get you back on track, or they’ll clarify the final status of your funds.
Multi-chain strategies
Bridging isn’t just about jumping to a new chain and staying there. You can also juggle multiple chains to access different rates, unique DeFi products, or specialized NFT markets. Maybe you’ll bridge from Ethereum to Berachain for yield farming, then pivot from Berachain to another chain for cheaper gaming dApps.
If you’re someone who wants to keep tabs on multi-chain opportunities:
- Watch bridging announcements: Protocols often add new tokens or upgrade their bridging reliability, which might reduce fees or speed up confirmations.
- Monitor bridging expansions: Many cross-chain solutions incorporate bridging to lesser-known chains, including your future pivot between Berachain and Gravity Chain.
- Diversify your assets: Don’t hold everything in one chain. Crypto markets shift fast, and bridging your tokens among multiple ecosystems can spread your risk and open new yield-earning strategies.
Stay secure and informed
Cross-chain bridging can be a treat, but it pays to be extra cautious when dealing with untested protocols or suspicious token addresses. Sticking to the motto “Do your own research” helps you avoid unwelcome surprises.
- Verify official resources: Never click random links from social media or private messages. Go to the official website or community channels.
- Use test transactions: Whenever bridging large sums, send a tiny test first. It’s worth paying a bit more in fees to protect your main stash of capital.
- Keep your software updated: Update your wallet extension or mobile app regularly to patch security vulnerabilities.
- Watch out for phishing: Hackers might replicate a bridging site’s layout. Double-check the URL and certificate if possible.
Baltex.io, along with many other bridging services, invests in audits and frequent protocol checks. Keep an eye on their announcement channels for security news or scheduled maintenance.
Why Berachain?
You might be wondering, “I have a million bridging options. Why Berachain?” This network is garnering attention for its specialized approach to DeFi. By bridging over, you get access to:
- Novel staking and reward systems: Berachain might offer unique mechanics for token holders to grow their holdings faster than on some older networks.
- Speedy transactions: Emerging layer-1 or layer-2 blockchains often have a higher throughput compared to legacy Ethereum, potentially cutting your transaction wait times.
- Developers building new dApps: Being early on Berachain could mean you’ll discover fresh DeFi or NFT projects before they skyrocket in popularity.
- Interoperability: Although it’s a younger chain, Berachain strives to be interoperable with networks like Gravity Chain and beyond.
Final bridging checklist
Before you click the “bridge” button, here’s a final mini-checklist to ensure a peaceful crossing:
- Confirm you have enough gas on your origin chain.
- Verify you’ve added Berachain’s network details to your wallet.
- Check that your bridging service is recognized and reputable.
- Look at the bridging fees and final net tokens you’ll receive.
- Press confirm and wait patiently for transaction finality.
FAQ revisited: bridging regrets
Concerned about bridging regrets? As in, “What if I move my tokens to Berachain but realize I need them back the very next day?” The nice thing about bridging is that it works in both directions. If you truly regret bridging, you can hop right back. Just remember that reversing the process means paying fees again. Planning ahead is the best approach.
Another look at Baltex.io
If the bridging conversation has you worried about complicated steps, tools like Baltex.io are essentially bridging “assistants.” They reduce guesswork by bundling network fee estimations, route selection, and user prompts in one user-friendly workflow. Use them once or twice, and you’ll see why bridging no longer feels like a cryptic puzzle.
Wrapping up
Bridging to Berachain may sound intimidating at first, but it’s a straightforward process once you get familiar with the basics. You’ll set up your wallet, fund it with enough gas for fees, pick a bridging interface like Baltex.io, and monitor your transaction as it finalizes. From there, you’re free to explore everything Berachain has to offer — from DeFi pools and NFT marketplaces to brand-new dApps that pop up every day.
If you’re uncertain at any step, reading bridging tutorials or checking in with the Berachain community can clarify any hiccups. And remember, always keep your seed phrase private, do small test transfers, and keep an eye on official updates from your chosen bridging provider. Now you’re well on your way to bridging success.
So go ahead and give it a try. Enjoy discovering new yield strategies, exploring fresh dApps, and maybe stumbling upon the next big crypto trend — all on Berachain! If you find an especially nifty bridging trick or a helpful resource, be sure to share it with your fellow crypto adventurers. It’s all part of what makes cross-chain exploration so exciting. Safe travels!
See others posts
G. Khan
Connext Network Review (July 2026): Fast & Trustless Cross-Chain Transfers
G. Khan
Symbiosis Protocol Review (July 2026): One-Click Omni-Chain Routing
G. Khan
UniswapX Review (July 2026): Gas-Free Cross-Chain Swaps Explained

G. Khan
Intent-Based Bridges vs. Traditional Bridges: What's the Difference?
G. Khan
Cross-Chain MEV: How to Avoid Sandwich Attacks When Bridging (2026)
G. Khan